15 October 2013

Hi, in this post I will show you how to get started with using Entity Framework.
Entity Framework is an ORM (object-relational mapper) developed by Microsoft. ORM’s abstract away the work needed for object-based languages (such as C#) to work with relational databases (such as SQL Server).
Entity Framework Code First can free you from:
Entity Framework does all of these for you.
There are three modes of development when using Entity Framework:
In this post, we will be working with the first option, Entity Framework Code First.
To include the Entity Framework dll in your solution, you can simply download it through NuGet. By the way, I am using a console application with Visual Studio 2012 in this demo.
Since we’re doing code first, we will write some code first.
We will be using a simple Person class, with the following definition:
public class Person
{
    public int Id { get; set; }
    public string Name { get; set; }
    public DateTime Birthday { get; set; }
}
This class will represent a table row in the database.
Next, we will create a “context” class. If the Person class represents a table row, then you can think of the context class as representing the database. Here is its definition:
// Include this reference
using System.Data.Entity;

public class ExampleContext : DbContext
{
    public DbSet<Person> People { get; set; }
}
Note that we inherited from the DbContext class. This allows us to take advantage of entity framework’s functionality. Also notice the DbSet<> member. You can think of this member as representing a database table.
Now that we have the database and a table represented, let’s now build some queries. Let’s add a couple of methods to our Person class:
public class Person
{
    // ...

    public static IList<Person> GetAll()
    {
        using (var db = new ExampleContext())
        {
            return db.Persons.ToList();
        }
    }

    public void Save()
    {
        using (var db = new ExampleContext())
        {
            db.Persons.Add(this);
            db.SaveChanges();
        }
    }
}
We should be all set for a little demonstration.
At this point we have all the classes set up, but we haven’t done anything database-related. Entity framework will create the database for us as soon as we need it.
Let’s demonstrate inserting data. Type the following code and then run the project:
var p = new Person
{
    Name = "John Smith",
    Birthday = DateTime.Now
};
p.Save();
Believe it or not, the Person has been saved in the database! To be sure, we can check the table contents.
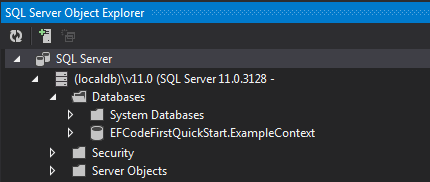
By default, entity framework uses the LocalDb as the data server. So, in order to see the database, we look at the SQL Server Object Explorer. Here is a screen grab taken from my machine:

We can see that the database was created, and the name is the fully-qualified name of our context class.
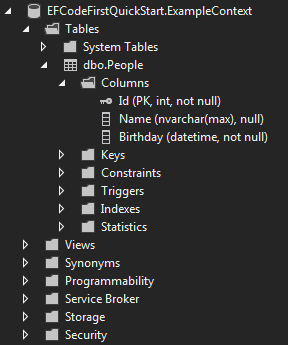
Further drilling down will reveal the table representing the DbSet<Person>. Let’s take a look at that:

The People table has been created, and each member was assigned an individual column. Not only that, notice that the Id column was automatically set as the primary key.
Now we can finally check the data. Here is another screen grab showing the contents of that table:

You can see that the entry has been successfully saved to the database.
Now let’s retrieve and display the data. Run the following code:
foreach (var person in Person.GetAll())
{
    Console.WriteLine("{0} was born on {1}", person.Name, person.Birthday);
}
The output should be something like:

Congratulations! You have now created your very first entity framework application.